
Curl
In this page you will find documentation about how to access SWIFT through curl.
Usage
Here we refer to the man pages of curl. But we do like to point out the following options:
curl(1)
- -i
Include the HTTP-header in the output. The HTTP-header includes things like server-name, date of the document, HTTP-version and more…
- -s
Silent or quiet mode. Don’t show progress meter or error messages. Makes curl mute. It will still output the data you ask for, potentially even to the terminal/stdout unless you redirect it.
- -S
When used with -s, it makes curl show an error message if it fails.
Authentication
First you need to get a token that can be used instead of user name and password. Authentication is done through keystone. Keystone supports V3 authentication. Information on how to generate a token using curl is at: Create token using curl
Create a container
curl -i -X PUT -H "X-Auth-Token: <token>" <storage url>/mycontainer
Upload/Download an object to/from container
Uploading an object:
curl -i -T myobject -X PUT -H "X-Auth-Token: <token>" <storage url>/mycontainer/myobject
Downloading an object:
curl -s -S -X GET -H "X-Auth-Token: <token>" <storage url>/mycontainer/myobject -O
Getting metadata
Information about containers can be obtained by:
curl -i --head -H "X-Auth-Token: <token>" <storage url>/mycontainer
Information about an object can be retrieved through:
curl -i --head -H "X-Auth-Token: <token>" <storage url>/mycontainer/myobject
List the containers of an account
curl -s -S -X GET -H "X-Auth-Token: <token>" <storage url>
List the contents of a container
curl -s -S -X GET -H "X-Auth-Token: <token>" <storage url>/mycontainer
Delete a container
curl -s -S -X DELETE -H "X-Auth-Token: <token>" <storage url>/mycontainer
Note
Important: You can only delete an empty container. If you try to delete a non empty container, then you get the error message: “There was a conflict when trying to complete your request.”
Delete an object
curl -s -S -X DELETE -H "X-Auth-Token: <token>" <storage url>/mycontainer/myobject
Set and get your own metadata for containers and objects
For containers we have:
curl -s -S -X POST -H "X-Auth-Token: <token>" -H "X-Container-Meta-mymetadata: mystuff" <storage url>/mycontainer
Note
Important: The header which denotes the metadata item has to be of the form X-Container-Meta-<name> for containers.
For objects we have:
curl -s -S -X POST -H "X-Auth-Token: <token>" -H "X-Object-Meta-mymetadata: mystuff" <storage url>/mycontainer/myobject
Note
Important: The header which denotes the metadata item has to be of the form X-Object-Meta-<name> for objects.
Get the metadata for containers:
curl -s -S --head -H "X-Auth-Token: <token>" <storage url>/mycontainer
which lists only the metadata. Or:
curl -i -X GET -H "X-Auth-Token: <token>" <storage url>/mycontainer
which shows container metadata and lists objects.
Get the metadata for objects:
curl -s -S --head -H "X-Auth-Token: <token>" <storage url>/mycontainer/myobject
which lists only the metadata. Or:
curl -i -X GET -H "X-Auth-Token: <token>" <storage url>/mycontainer/myobject
which shows container metadata and gets the object data.
Uploading large files (>5GB)
It is only possible to upload objects with the size of at most 5GB in one go to SWIFT. It is possible to up and download larger objects. For this we refer to the documentation on large objects at: https://docs.openstack.org/swift/latest/overview_large_objects.html.
- There are dynamic large objects and static large objects.
Static Large Object - Relies on a user provided manifest file. Advantageous for use cases when the developer wants to “mashup” objects from multiple containers and reference them in a self-generated manifest file. This gives you immediate access to the concatenated object after the manifest is accepted. Uploading segments into separate containers provides the opportunity for improved concurrent upload speeds. On the downside, the concatenated object’s definition is frozen until the manifest is replaced.
Dynamic Large Object - Relies on a container-listing zero-byte manifest file. Advantageous for use cases when the developer might add/remove segments from the manifest (e.g. objects from the container) at any time. A few disadvantages include reliance on eventual consistent container listings which means there may be some delay before access to the full concatenated object is available. There is also a requirement for all segments to be in a single container, which can limit concurrent upload speeds.
Dynamic Large Objects
Suppose we have a 100MB file, called file, that is uploaded in three chunks or segments. Create a container for the big file:
curl -i -X PUT -H "x-auth-token: ${<token>}" ${<storage url>}/mybigfilescontainer
Split the big file into 40MB chunks
split -b 40000 file
The file is now split up in three files called xaa, xab, xac. Upload the three chunks to the segments container:
-rw-r--r-- 1 ron ron 100000000 apr 24 18:21 file
-rw-r--r-- 1 ron ron  40000000 apr 24 18:39 xaa
-rw-r--r-- 1 ron ron  40000000 apr 24 18:39 xab
-rw-r--r-- 1 ron ron  20000000 apr 24 18:39 xac
curl -i -X PUT -H "X-Auth-Token: ${<token>}" ${<storage url>}/mybigfilescontainer/file/001 --data-binary @xaa
curl -i -X PUT -H "X-Auth-Token: ${<token>}" ${<storage url>}/mybigfilescontainer/file/002 --data-binary @xab
curl -i -X PUT -H "X-Auth-Token: ${<token>}" ${<storage url>}/mybigfilescontainer/file/003 --data-binary @xac
Upload the manifest file:
curl -i -X PUT -H "X-Auth-Token: ${<token>}" -H 'X-Object-Manifest: mybigfilescontainer/file/' ${<storage url>}/mybigfilescontainer/file --data-binary ''
Now you can download the file normally.
Static Large Objects
Suppose we have a 100MB file, called file, that is uploaded in three chunks. Create a container for the big file and a separate container for the segments:
curl -i -X PUT -H "x-auth-token: ${<token>}" ${<storage url>}/mybigfilescontainer
curl -i -X PUT -H "x-auth-token: ${<token>}" ${<storage url>}/mybigfilescontainer_segments
Split the big file into 40MB chunks
split -b 40000 file
The file is now split up in three files called xaa, xab, xac. Upload the three chunks to the segments container:
-rw-r--r-- 1 ron ron 100000000 apr 24 18:21 file
-rw-r--r-- 1 ron ron  40000000 apr 24 18:39 xaa
-rw-r--r-- 1 ron ron  40000000 apr 24 18:39 xab
-rw-r--r-- 1 ron ron  20000000 apr 24 18:39 xac
Upload the three segments to the segments container:
curl -i -X PUT -H "x-auth-token: ${<token>}" ${<storage url>}/mybigfilescontainer_segments/xaa --data-binary @xaa
curl -i -X PUT -H "x-auth-token: ${<token>}" ${<storage url>}/mybigfilescontainer_segments/xab --data-binary @xab
curl -i -X PUT -H "x-auth-token: ${<token>}" ${<storage url>}/mybigfilescontainer_segments/xac --data-binary @xac
Create the manifest file:
MANIFEST="["

for sp in /mybigfilescontainer_segments/xaa /mybigfilescontainer_segments/xab /mybigfilescontainer_segments/xac; do

    ETAG=$(curl -I -s -H "X-Auth-Token: ${<token>}" "${<storage url>}$sp" | perl -ane '/Etag:/ and print $F[1];');
    SIZE=$(curl -I -s -H "X-Auth-Token: ${<token>}" "${<storage url>}$sp" | perl -ane '/Content-Length:/ and print $F[1];');
    SEGMENT="{\"path\":\"$sp\",\"etag\":\"$ETAG\",\"size_bytes\":$SIZE}";
    [ "$MANIFEST" != "[" ] && MANIFEST="$MANIFEST,";   MANIFEST="$MANIFEST$SEGMENT";

done

MANIFEST="${MANIFEST}]"
This generates a manifest file like this:
[{"path":"/mybigfilescontainer_segments/xaa",
  "etag":"48e9a108a3ec623652e7988af2f88867",
  "size_bytes":40000000},
 {"path":"/mybigfilescontainer_segments/xab",
  "etag":"48e9a108a3ec623652e7988af2f88867",
  "size_bytes":40000000},
 {"path":"/mybigfilescontainer_segments/xac",
  "etag":"10e4462c9d0b08e7f0b304c4fbfeafa3",
  "size_bytes":20000000}]
Then upload the manifest file like this:
curl -i -X PUT -H "X-Auth-Token: ${<token>}" ${<storage url>}/mybigfilescontainer/file?multipart-manifest=put --data-binary "$MANIFEST"
After this you can download the file as normal.
The ETag of the whole file can be computed as:
echo -n 'etagoffirstsegmentetagofsecondsegmentetagofthirdsegment...' | md5sum
So in this case this would be:
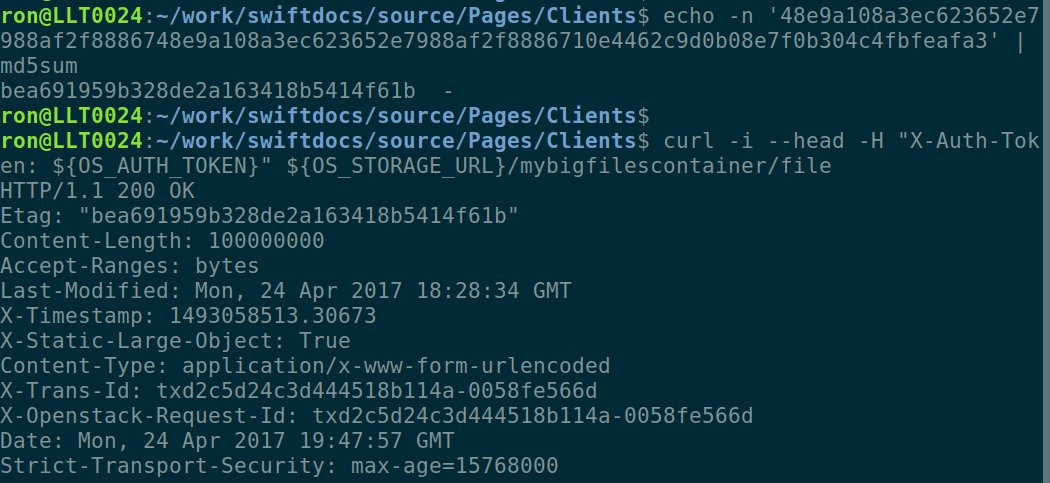
Run the following command to throw away the file, the segments and the manifest file:
curl -i -X DELETE -H "X-Auth-Token: ${<token>}" ${<storage url>}/mybigfilescontainer/file?multipart-manifest=delete
Copy an object
curl -i -X COPY -H "X-Auth-Token: <token>" -H "Destination: anothercontainer/myobject" <storage url>/mycontainer/myobject
Renaming containers and objects
Note
Important: It is NOT possible to rename a container. This means that you have to think really well about naming containers before you upload a PB of data.
It is possible to rename an object but not in the classical sense. First you need to copy an object using, for example, the method above and then throw the original object away.
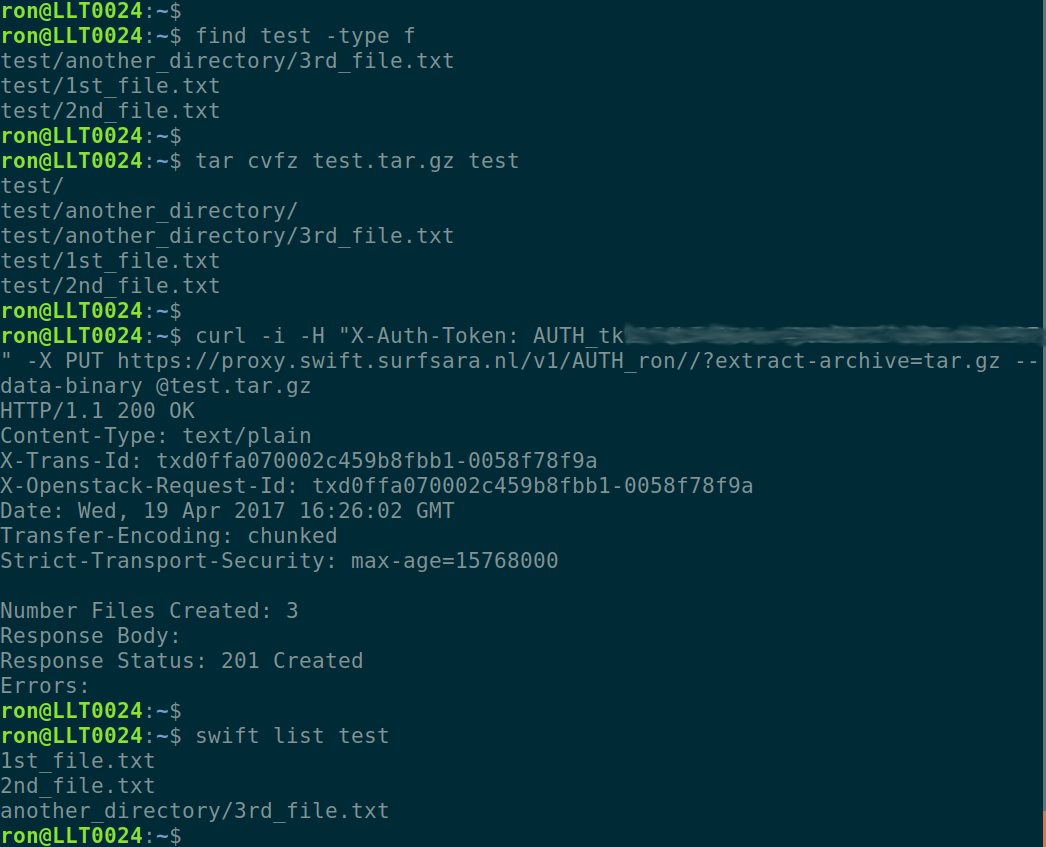
Bulk operations
You can upload a tarball which will be extracted by SWIFT.
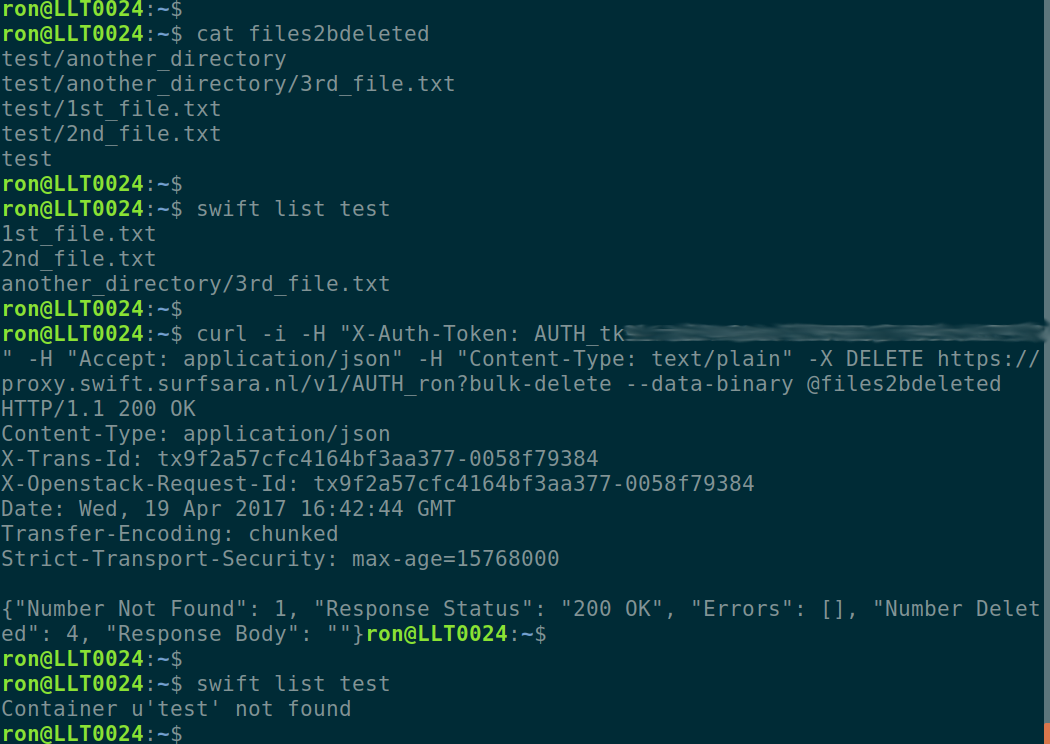
It is possible to do a bulk deletion. First you create a text file with all the containers and objects to be deleted. After that everything goes as follows:
Object versioning
You can store multiple versions of your content so that you can recover from unintended overwrites. Object versioning is an easy way to implement version control, which you can use with any type of content.
First you need to create a container to store older versions of the objects:
curl -i -X PUT -H "X-Auth-Token: <token>" <storage url>/mycontainer_versions
Then create a container for the latest version of the objects and tell SWIFT where to store the older versions of the object:
curl -i -X PUT -H "X-Auth-Token: <token>" -H "X-Versions-Location: mycontainer_versions" <storage url>/mycontainer
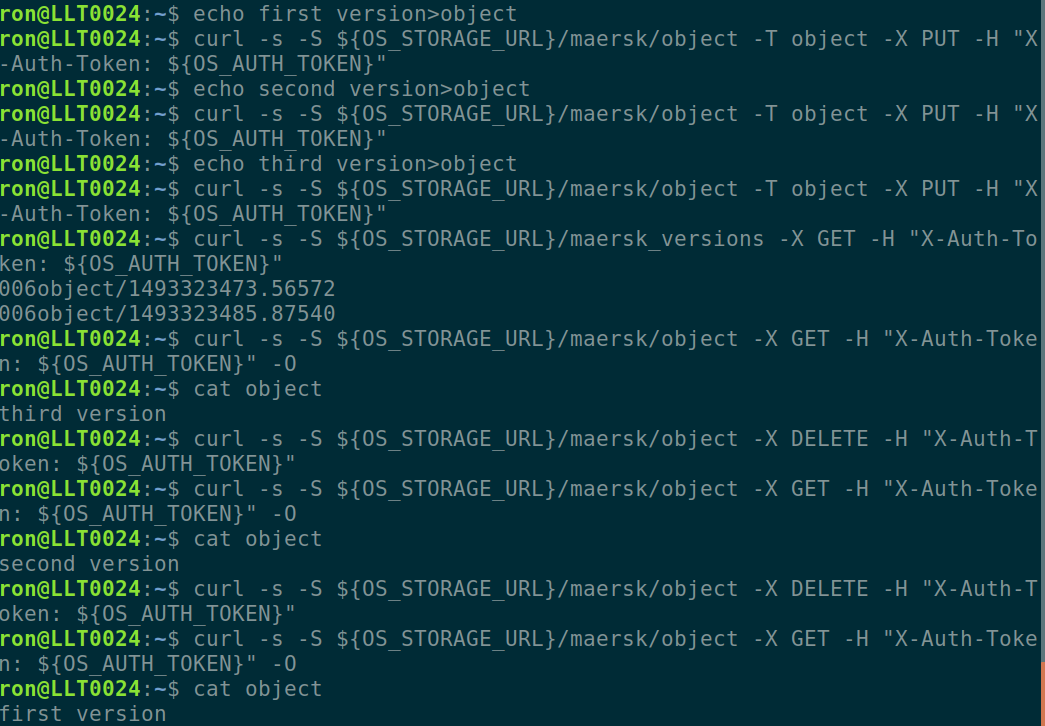
If you upload an object to a container and after that, upload a newer version of an object to the same container. The older version of the object is placed an a separate container. In this case that container would be maersk_versions under a name like:
<hexadecimal length of object name><object name><timestamp>
If you throw the latest version of the object away, the second latest version of the object is placed back into the container.
Here below is an example:
ACLs
There are account ACLs and container ACLs. With account ACLs you can grant different levels of access to all containers in an account. Using container ACLs you grant different levels of access to individual containers. More information on this is available at: https://docs.openstack.org/swift/latest/overview_acl.html.
Object expiration
You can set object to expire. This means that object will be automatically deleted after a certain period of time. More information on this may be found at: https://docs.openstack.org/swift/latest/api/object-expiration.html. This web page holds information about the swift commandline client. But it is straight forward to set the X-Delete-At and X-Delete-After headers in a curl command.
Temporary/Pre-signed URLs
For SWIFT these are called TempURLs and for S3 they are called Pre-signed URLs. These are urls that give temporary access to objects. How this works is described below.
SWIFT TempURLs
With the TempURL mechanism it is possible to provide temporary access to objects. This can be really useful if large opjects need to be downloaded from SWIFT storage that does not have public access.
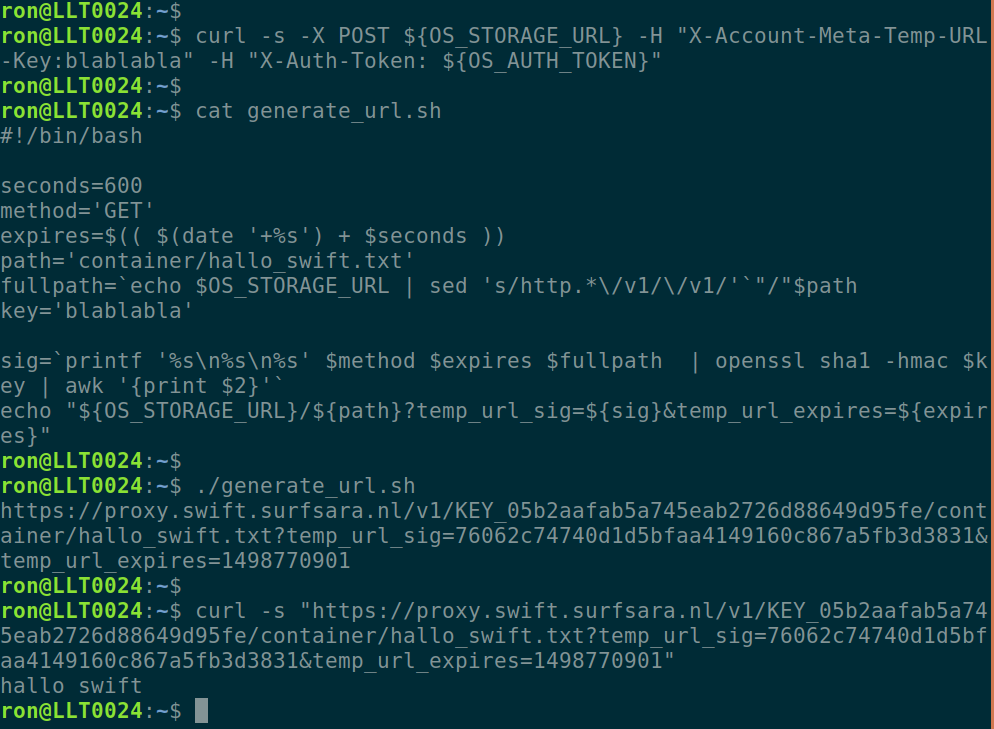
First you have to create a key:
curl -i -X POST ${OS_STORAGE_URL} -H "X-Account-Meta-Temp-URL-Key:<some string you have to make up yourself>" -H "X-Auth-Token: ${OS_AUTH_TOKEN}"
Then you create the TempURL.
#!/bin/bash

seconds=<number of seconds until url expires>
method='<method>'
expires=$(( $(date '+%s') + $seconds ))
path='<container>/<object>'
fullpath=`echo $OS_STORAGE_URL | sed 's/http.*\/v1/\/v1/'`"/"$path
key='<some string you have to make up yourself>'

sig=`printf '%s\n%s\n%s' $method $expires $fullpath  | openssl sha1 -hmac $key | awk '{print $2}'`

# print the URL
echo "${OS_STORAGE_URL}/${path}?temp_url_sig=${sig}&temp_url_expires=${expires}"
Here method may be PUT, GET, HEAD, POST and DELETE. The amount of seconds that an TempURL is valid is given by seconds. The path is last part of the url of the StorageURL after hostname. Finally the key is the random string you have made up yourself.
An example is below:
S3 pre-signed URLs
A pre-signed url gives temporary access to objects. For S3 this is a bit more involved than for SWIFT. Therefore we provide you with a script that generates such an URL. It can be downloaded from: get_presigned_url.py.
It will run for python2 and python3.
usage: get_presigned_url.py [-h] -b BUCKET -o OBJECT -m {put,get} [-e EXPIRATION]

Create a presigned s3 url.

optional arguments:
  -h, --help            show this help message and exit
  -b BUCKET, --bucket BUCKET
                        supply bucket name (default: None)
  -o OBJECT, --object OBJECT
                        supply object name (default: None)
  -m {put,get}, --method {put,get}
                        supply http method (default: None)
  -e EXPIRATION, --expiration EXPIRATION
                        supply expiration in seconds (default: 86400)
This script returns a pre-signed URL PRESIGNED_URL that can be used to upload an object like:
curl --upload-file OBJECT 'PRESIGNED_URL'
or download an object like:
curl 'PRESIGNED_URL' -o OBJECT
Do NOT forget the ‘ s.
Serving Static Web Pages
SWIFT offers the possibility to serve data in containers as a static web site. The staticweb page has more.